In order to achieve a successful copy of your DVD, you must first know what format the original disk is in. This is important because the different formats are different sizes, hence you may need to "tweak" the data of a larger format. The most common are D5 and D9 DVD disk. DVD 5 is a single layer disk that holds about 4.7GB of data, which is about 133 minutes of video. This size disk is available in the -R and +R format. This confuses consumers when they go to buy blank DVD disk and see the -R/+R formats. All this means is that a different manufacturing process was done to make the disk. In technical terms, the + R format is able to achieve better writing because it delivers more information to the drive.
The D9 disk is a single side dual layer media that holds more data. This DVD disk can store about 8.5GB of data, which is about 240 minutes of video. DVD 9 disk are harder to duplicate due to its size. The common method used to make a copy of your DVD in this format, is to shrink or reduce the data from a D 9 disk. This can be done using programs that are on the market and some are free. Shrinking methods are used to convert the D9 format to the D5 format. It sounds confusing, but what you are doing is trimming data from the D9 disk in order to make it fit on a recordable blank D5 disk. D5 disk are the most common found in stores and D9 recordables are more expansive and can take 2-6 hours to duplicate. The shrinking method is best if you just want to copy your DVD movie without all the extra features like cut scenes etc. I will be posting a future tutorial on how to shrink data and use a D5 disk to record your data.
Thursday, September 13, 2007
Monday, September 10, 2007
Is It OK To Copy DVDs ?
The record music industry cringes at the slightest mention of copying their material even if you own the material. In this instance we are talking about copying DVDs that you have bought at a store and want to make a backup. The public has the law on their side as stated by the Fair Use Act of 1992 and the Audio Home Recording Act of 1992. You may legally make a copy of your DVD for personal backup if you were the original buyer and owner of the DVD. These Acts state that copyright holders cannot sue the average user for making backups of their purchased media. However, this act does not require the recording companies to make available any technology that does so. This is what makes it difficult for the average user to just simply make a copy.
I'm sure you have tried to just place a DVD in the drive and think you were easily going to copy the data and then burn it to a DVD. Not the case as you have come to learn. Its easy to do, but some instruction is required. In the following tutorial, I will demonstrate the process by which you have to follow in order to achieve a quality copy of your DVD.
Tutorial
I'm sure you have tried to just place a DVD in the drive and think you were easily going to copy the data and then burn it to a DVD. Not the case as you have come to learn. Its easy to do, but some instruction is required. In the following tutorial, I will demonstrate the process by which you have to follow in order to achieve a quality copy of your DVD.
Tutorial- Step 1
Tutorial-Step 2
Tutorial-Step 3

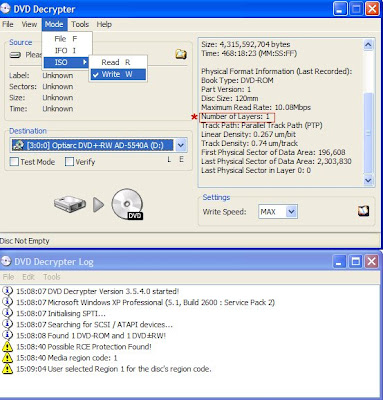
We need to see if the disk
is in the format that we need in order to continue.Click mode,iso, then read. You can see in the
picture how to follow this instruction. I circled what we are looking for.
The number of layers must be "1" in order for us to continue. 1 layer means this disk is in the
format of DVD-5 and it will fit on a blank DVD disk. If it was a 2, we would need to take another
approach which will be covered in a future tutorial.
Tutorial-Step 4
Tutorial-Step 5
Tutorial-Step 7
Tutorial-Step 8
Tutorial-Step 9
Tutorial-Step 10
Tutorial-Step 11
Tutorial-Step 12 (Final)
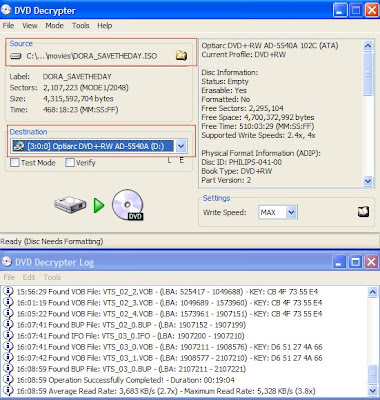
Once the disk is formated/erased, it will begin to copy the files to your blank DVD.
Once its finished, you're done.
Once its finished, you're done.
Wednesday, September 5, 2007
Chosing The Right Software
The most important aspect of copying DVD's is choosing a program that best suits your needs. There are many available on the market that are easy to use and inexpensive. The first thing to research is a programs ability to be easily understood. The more elaborate a program is designed, the harder it will be to use. Generally, I stick with programs with a one button next step process that is easily understood no matter what level of experience you have with a computer. Secondly, you should have the proper hardware in your computer. Sufficient hardware will make the process of copying much quicker. If your computer is older and lacking adequate memory, you may run into program crashes and 2 hour long copy sessions. Again, do some research and see what other users are saying about the software they use and which hardware they have.Before deciding to copy DVD's, be sure you are the owner of the disc being copied. It is illegal to copy DVD's that you do not own. Once that is established, you may legally copy any disc you own.
After doing some research, you will see many "free" programs offered all over the internet. These programs tend to be easy to use, but some have hidden cost. Be sure to read reviews and be certain they do not contain spy ware or adware. I have personally had good experiences with free copy software, but found they tend to lack some needed options. For instance, you may need to compress a DVD in order for it to fit on a CDR disk. CDR disks are used if you want to copy a DVD to watch on your computer. CDR's are much cheaper in bulk than blank DVD's and can be replaced cheaper if you damage or lose a copied DVD.Some other programs even offer a free trial, which doesn't hurt if you aren't committed to buy.
Making copies ensures your original disks will stay in pristine condition. For example, if you have children who view DVD's in their bedrooms, you know how abused these disk's become. Also, if your traveling you can have copies and not worry about losing them. Basically, you are protecting your initial investment of the DVD you bought.In later articles we will discuss tips and tricks to copying DVD's.
Types of DVD Software
After doing some research, you will see many "free" programs offered all over the internet. These programs tend to be easy to use, but some have hidden cost. Be sure to read reviews and be certain they do not contain spy ware or adware. I have personally had good experiences with free copy software, but found they tend to lack some needed options. For instance, you may need to compress a DVD in order for it to fit on a CDR disk. CDR disks are used if you want to copy a DVD to watch on your computer. CDR's are much cheaper in bulk than blank DVD's and can be replaced cheaper if you damage or lose a copied DVD.Some other programs even offer a free trial, which doesn't hurt if you aren't committed to buy.
Why Make Copies?
Making copies ensures your original disks will stay in pristine condition. For example, if you have children who view DVD's in their bedrooms, you know how abused these disk's become. Also, if your traveling you can have copies and not worry about losing them. Basically, you are protecting your initial investment of the DVD you bought.In later articles we will discuss tips and tricks to copying DVD's.
Subscribe to:
Posts (Atom)


